
Raspberry Pi is a credit card-sized computer that can be used for various DIY projects, including robotics. One of the essential components of robotics is a servo motor, which can be used for a variety of purposes such as moving an arm, controlling a camera, or steering a robot. In this tutorial, we will explore how to connect a Raspberry Pi with an MG995 servo motor.
The MG995(R)
The MG995 servo is a type of motorized actuator that is commonly used in robotics and automation projects. It is a high-torque servo motor that can rotate to a specific position based on the electrical signals it receives from a controller.
The MG995 servo operates on a pulse-width modulation (PWM) signal, which is a type of digital signal that is commonly used to control motors and other devices. By varying the width of the PWM signal, the servo can be made to rotate to different positions, allowing for precise control over its movement. We will control the length of this signal with our Raspberry Pi.
Materials
Before starting the project, you will need to gather the following materials:
- Raspberry Pi (any model) - Amazon link
- MG995 Servo Motor - Amazon link
- Breadboard (optional)
- Male-to-female jumper wires - Amazon link
Making the connections
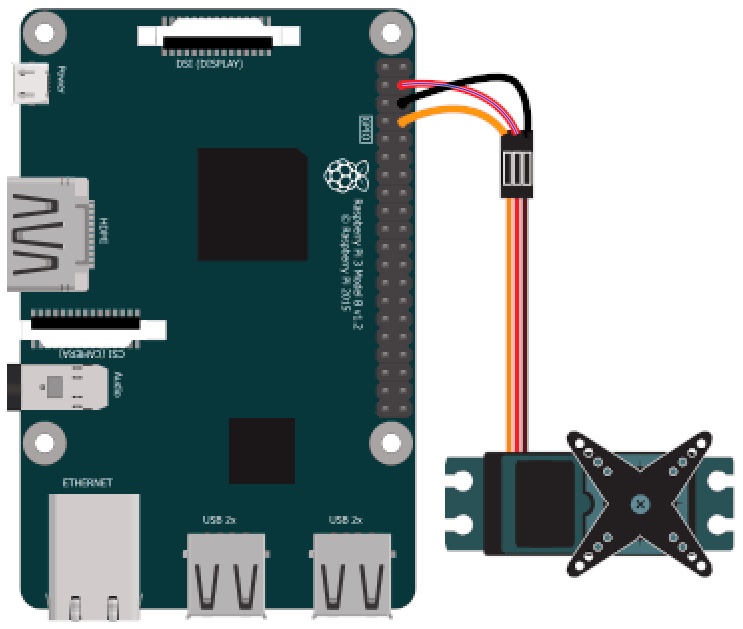
The MG995 servo motor has three wires: red (power), brown (ground), and orange (signal). To connect the servo motor to the Raspberry Pi, follow these steps:
- Connect the red wire of the servo motor to the 5V power source.
- Connect the brown wire of the servo motor to the ground of the Raspberry Pi.
- Connect the orange wire of the servo motor to a GPIO pin 13 of the Raspberry Pi.
Writing the Python code
Now that we have connected the servo motor and installed the required libraries, we can write the Python code to control the servo motor. Open a new file in the terminal window and type the following:
import RPi.GPIO as GPIO
import time

GPIO.setmode(GPIO.BCM)
GPIO.setup(13, GPIO.OUT)

p = GPIO.PWM(13, 50)  # PWM frequency is 50Hz
p.start(2.5)  # Initialization

try:
    while True:
        p.ChangeDutyCycle(5)  # Rotate the servo motor to 90 degrees
        time.sleep(1)
        p.ChangeDutyCycle(10)  # Rotate the servo motor to 180 degrees
        time.sleep(1)
except KeyboardInterrupt:
    p.stop()
    GPIO.cleanup()
In the code above, we first import the necessary libraries and set the GPIO mode to BCM. We then set up GPIO pin 13 as an output pin and initialize the PWM signal with a frequency of 50Hz and a duty cycle of 2.5 (which is equivalent to 0 degrees).
We then enter a while loop that will rotate the servo motor to 90 degrees and then 180 degrees with a delay of one second between each rotation. Finally, we handle the KeyboardInterrupt exception and stop the PWM signal and clean up the GPIO pins.
Run the code
After running your file you should see the servo motor should start rotating to 90 degrees and then 180 degrees with a delay of one second between each rotation.
Conclusion
In this tutorial, we learned how to connect an MG995 servo motor to a Raspberry Pi and control it using Python code. We hope this tutorial was helpful and inspires you to build your own robotics projects using Raspberry Pi.
Good luck and happy coding!